This is how you do a showreel. Some great work done with Arnold.
My Cancer Pal
Very pleased to see my work used for a worthy cause.

MtoA Shader Conversion Script
Converting old Maya/ mental ray shaders to MtoA can be tedious. However, there is a shader conversion script available to make this process easier.
A sample mrShadersToArnold.py conversion script is available in the \docs directory of the MtoA installation folder. This simple script converts unsupported materials (phong, blinn, mia_material etc..) to an Ai Standard shader.
alCurvature shader

The alCurvature shader measures the local curvature of the surface. This shader is an easy way to add detail and realism to your shaders. In this short tutorial we will use the alCurvature shader to mimic a shading painting technique effect on a model of a lead figurine.
Layer alSurface Shaders
An alLayer shader is used to layer two different alSurface shaders. We will use one alSurface shader for the black paint layer and another alSurface shader to represent the exposed metallic surface underneath.
- Create an alLayer shader and assign it to the object.
- Create an alSurface shader and rename it Black Paint. Connect it to Layer 1 of the Layer shader.
- Create another alSurface shader and rename it Metal. Connect it to Layer 2 of the Layer shader.
alCurvature Shader
- Connect the alCurvature (Outcolor R) to the Mix attribute of the alLayer shader. This will control the blending between the two alSurface shaders.
- You can use the Radius attribute to pick out finer details in the figurine model. The default value of 1 is too large for our model. Reduce it to around 0.01. The images below show the effect this has on the alCurvature shading.


Final shader network
Uglykids: AlSurface Shader Library

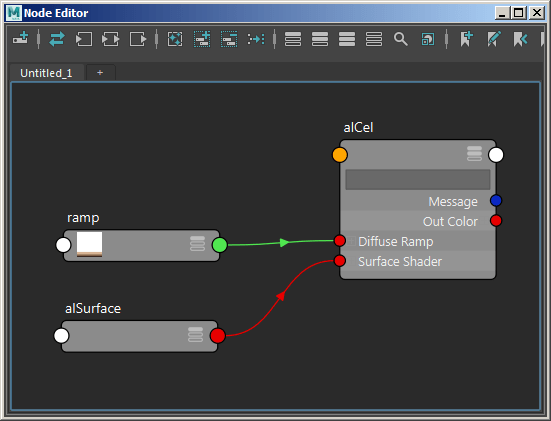
alCel Shader

alCel
Cel shading is a rendering technique used to simulate the lighting in cartoon animation. In this short tutorial we will use the alCel shader to apply a cel shaded look to the skin of an anime style character.
- Start off by assigning an alCel shader to the skin surface of the model.
- Create an alSurface shader and connect it to the Surface Shader attribute of the alCel shader. We don’t want to add any specularity to the toon shading so reduce the Specular value to 1.
Ramp
- Create a ramp texture and connect it to the Diffuse Ramp attribute of the alCel shader. Change the Interpolation to none. This will give a toon like shading effect. Create a colored gradation similar to the example below.

The final shader network should look like this:
alCel: Diffuse Strength
We can adjust the toon shading effect using the Diffuse Strength. This attribute acts as a multiplier on the diffuse component before being passed through the ramp.
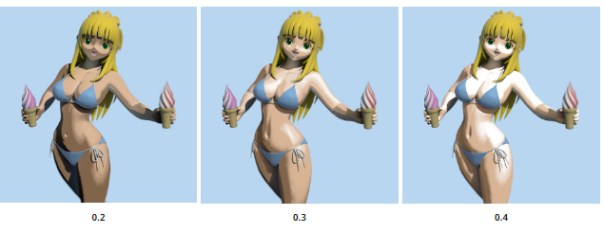
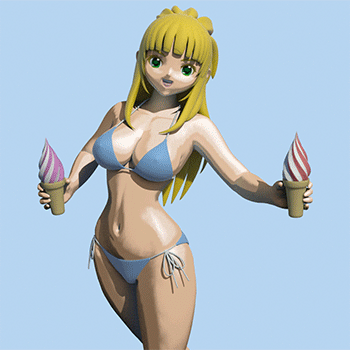
A simple way to tint the skin is to apply some color to the Diffuse Color of the alSurface shader. This will give the model a quick and easy tan!

That concludes this tutorial on how to create a toon shading effect using the alCel shader.
The MtoA shader used in this tutorial is available here.
AlJitterColor shader

The alJitterColor shader is useful for applying random color variation to scenes containing many objects. In this short tutorial we will add some variation to the hue and gain of some lemons using a combination of the Utility and alJittercolor shaders.
- Start off by assigning an alSurface shader to the lemons.
Utility Shader
- Create a Utility shader and change its Color Mode to Object. This mode uses the name of the shapes to compute the color (this is necessary because the Signal attribute of the alJitterColor shader requires a unique value per object). Change the Shade Mode to flat.

Utility shader set to ‘Object’ Color Mode
The Utility shader outputs values between 0 to 1. However, the alJitterColor input uses in values which are non float values. Therefore we will need to multiply the output value of the Utility shader to a larger number.
- Connect the Outcolor R of the Utility shader to the Input 1 attribute of a multiplyDivide node. You will also need to increase the Input 2 to a higher value. In this case we have used a value of 80.

Utility shader connected to Input 1 of multiplyDivide node
- Connect the Output of the multiplyDivide node to the Signal attribute of the alJitterColor shader.
- Connect the lemon texture map to the Input of an alJitterColor shader.
- Finally, connect the Out Color of the alJitterColor shader to the Diffuse Color of the alSurface shader.
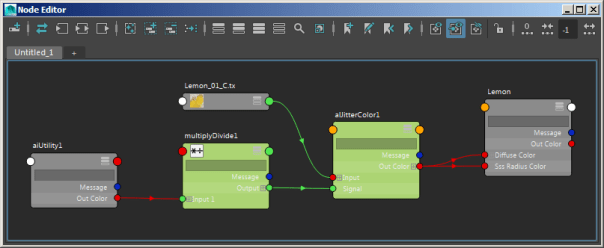
Final shader network
AlJitterColor Shader
Now that everything is connected correctly, we can have some fun adjusting the hue of our lemons. Before starting, reset the values of the alJitterColor shader.
Min Gain
- We can use the Min Gain to apply a minimum random gain to the lemons.

Min Gain: 1 (left). Min Gain: 0.25 (right).
Max Hue Offset
- We can also use the Max Hue Offset attribute to randomly adjust the hue of the lemon texture. In this case we only want to make a subtle adjustment and so a small value of 0.05 was used.

‘Max Hue Offset’ of AlJitterColor used as a hue shift for the lemon texture

Max Hue Offset: 0 (left). Max Hue Offset 0.05 (right)
That concludes this tutorial on how to use the alJitterColor shader to randomly change the hue and gain of a color texture map.
The MtoA shader is available here.
Wear and Tear with the Curvarture Shader

URs 3D Video Tutorials – Arnold with Maya 2017
Arvid Schneider has published a nice series of video tutorials using Arnold with Maya 2017. Some of them include using the ALSHADERS in MtoA.
Arnold for Maya 2017
Very excited to see Arnold for Maya as the default renderer for Maya 2017.
More information about some of the considerations required when using Maya’s native Color Management and Auto TX can be found here. The release notes are also available here.
More information is available on Autodesk’s official FAQ document.
Below is a video that briefly demonstrates Arnold in Maya 2017 that I contributed to.

You must be logged in to post a comment.